Pages

Thursday 11 April 2013

The day I lost my Washi Tape virginity!

So! I heard all about this washi tape stuff and thought I must give this a go! I wasn't really sure what it was but I ordered some rolls from amazon and off I went!!

My other half is off to a wedding next Saturday and their theme is bunting. There were some cardboard bunting decorations left over from his Mum's wedding the other week so I thought I would put my washi tape to good use and jazz them up a bit for a gift.


There are about 16 triangles altogether held in a row by some white ribbon. I tried to do a different design on all of them and I think I managed it!!

I was having a great time so thought I would attempt a washi tape card. I printed the text onto some cream card and then decorated it with the same washi tape that I used for the bunting. It's funny how the most simple designs usually turn out the most effective.


The card isn't very thick so I will have to put a paper insert into it to make it more sturdy.

Another successful day crafting I think!!

My next job is to try and make a chefs hat or something cooking related for a budding baker's birthday (try saying that quickly!!)

Have a great day,

Happy crafting xx

Monday 8 April 2013

Ding dong the bells are gonna chime...

My boyfriends Mum got married at the weekend and I wanted to make her some homemade gifts rather than getting her a shop bought present.

I decided to make them a wedding plaque using some wooden die cuts from Daisy Moon Designs. I used pastel colours to paint the different pieces and finished it off with some beautiful "All my love" ribbon from John Lewis to make the handle rather than using string that I have used before.


I wanted to do something a bit different for the card and found some inspiration from Paper Paws on Pinterest and adapted a design which included a wedding dress made out of a doily.


I used travel scrabble tiles to add a finishing touch to the card...which lead to this comment from my boyfriend "I-D-O....what's I-D-O"....wait a few minutes...."oh, I Do!!!" (bit worried when my Dad made the same comment as well!!).

It was a beautiful day, the sun was shining (even though it was freezing) and the atmosphere was wonderful!

Best wishes to Mr and Mrs Gilbert!!!

Happy Crafting xxx

Thursday 4 April 2013

Baby Countdown!

This will probably be my last post for today but I thought I would get this one done before I go!

My wonderful friend from Bluebell Stitches is cooking her second baby as we speak! I have been really inspired by the countdown gifts on pinterest and really wanted to make her something personal that she could us to count down to her new baby's birth with help from her son.

I bought some wooden die cuts from Daisy Moon Designs and painted them using basic pastel coloured poster paint.


I bought 3 little gingerbread men, pink for the Mum, dark blue for the Dad and light blue for their first son. 


I used chalk board paint to paint the heart so that my friend could use it as the countdown.


I used PVA glue to stick the pieces onto the background.


To add some extra detail I used baby hand and foot print buttons to decorate the bottle and added the initial of each person to their gingerbread man.


 I stamped the lettering using rubber stamps and black ink and added some string so that it could be hung up.

I bought a similar countdown board for my boyfriend for Christmas from Willow Crafts but it was so easy to make myself that I will defiantly be able to do my own ones in the future! 

Well, Bluebell Stitches is now down to about 12 weeks so I need to get thinking about new baby craft projects!!!

Well, that's all for today, I'll be back tomorrow with some wedding crafts I have been doing!

Take Care!

Happy Crafting xx

Today's Crafty Bits

Ok, today I have been attempting to make a case for my portable hard drive which is currently sat, getting battered, in the bottom of my school bag.

I got given some fantastic bee material which was just perfect for this and I found a really cool tutorial on Oh My Handmade.

So anyways I set off sewing and it was going fab until I finished it and realised it was much too small for my hard drive...doh!!


However, I also needed a new case for my iPod touch and it fitted in the bee case perfectly!!

Rather than using 2 sheets of felt, like the tutorial does, I used the bee material on the outside and black felt in the middle. I really struggled to find coloured elastic so I used black elastic instead for the fastening.

*   *   *

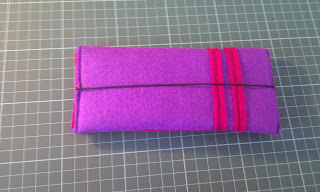
In another attempt I used a piece of pink and a piece of purple felt to make a slightly larger case (which I hoped would fit!!)

I jazzed it up a bit with some pink stripes on the outside and made the inner piece of felt a little bit longer to give it a pink border at the bottom.


Unfortunately, yet again, it was too small (I obviously need some more practice measuring)....but i'm sure i'll find a use for it!!!

What have we learnt from this....make sure you MEASURE carefully and give yourself enough extra material for hems.

I wish you better luck!!

Happy crafting xx

Quilted Sewing Machine Cover

I saw this sewing machine cover on pinterest and fell in love with it straight away!


The tutorial provided on Sew Delicious is fantastic too and so easy to follow. I had never done patchwork, quilting or used bias binding before but it was a doddle!!

My Mum had given me some lovely bright material a few months earlier and it was sat in my sewing box waiting for some inspiration...when this pattern came along it was perfect!!

I unfortunately didn't take photos of the process but here is a shot of the finished piece!


I used white bias binding to contract the bright patches and I used matching material to cover each end.

Inside I used a cream cotton material to keep things simple!

Right, time for some lunch but I'll be back this afternoon to catch up some more!!

Happy crafting xx


It's been too long!

I can't believe it's been almost a year since I posted a blog on here! I started teaching in September and have barely had time to breath since!

We have a lot of catching up to do!

So here are a few photos of what I've been up to craft wise since we last spoke!


I've been trying my hand at some paper crafts and have given origami a go too! 


 I made this baby count down for one of my friends who is eagerly awaiting the birth of her second child.


My sewing machine cover was looking pretty dull so I whipped up this patchwork one to brighten things up a bit!!

So there is a taste of what I've been up to. I'll go through some of these creations in a bit more detail in my next few blogs.

Anyways, I hope you're all having a lovely Easter! I'm glad to be back and hope to speak to you more regularly from now on!!

Happy crafting xx